You already know that letter reversals create confusion among early learners that can lead to long-term learning troubles, specifically related to reading progress...
...but, did you know that research indicates the problem may be much bigger than we first expected - yes, dyslexia is now possibly linked to these early learning blunders which can be completely avoided for your children.
If you want to bypass these early learning mistakes - using effective methods of teaching the alphabet that virtually eliminate 100% of these letter reversal troubles - then these letter reversal teaching tips are an absolute MUST READ!
While each of these tips is phenomenal, you'll want to pay careful attention to identify which of these, if not all of them, can be used right away in your daily lessons.
These 5 teaching tips will reveal how to prevent any further confusion and course correct your child's learning path, giving them a sense of confidence and certainty.
-
TIP #1 - Alphabet Font Choice
-
Children are strong visual and kinesthetic learners which means that images, signs, and symbols create initial impressions that go beyond audible explanation or reason. For instance, let's put this concept into practice right here for you.
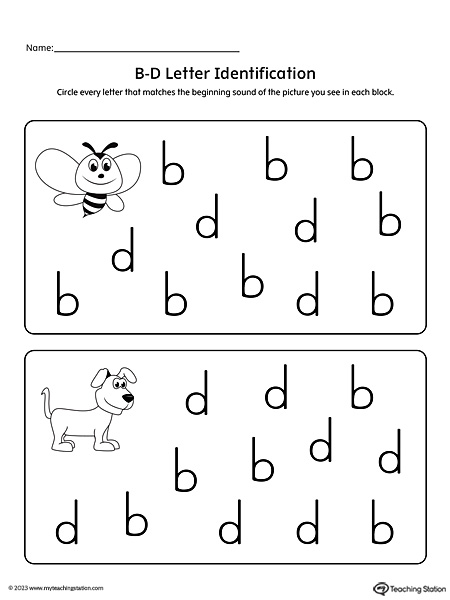
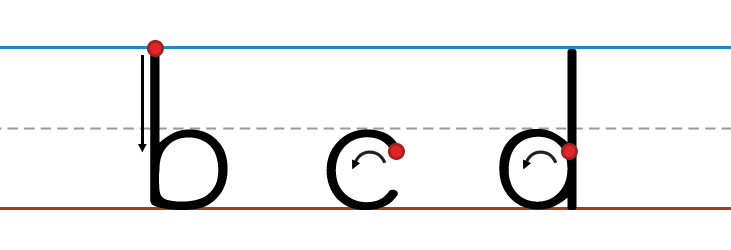
Take a look below at this commonly used font for teaching the letter b and d.
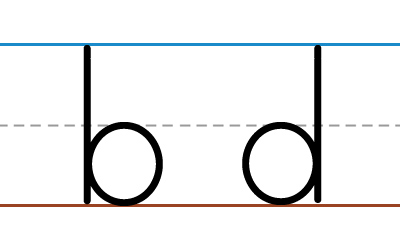
By using a traditional ball-and-stick font, these letters appear as a mirror reflection that creates added confusion for children who do not understand opposites.
HOWEVER, when using an appropriate alphabet learning font, the letter b has no "tail" extending to the bottom left, while the letter d has a "tail" extending to the bottom right - like that of a dog (d for dog.)
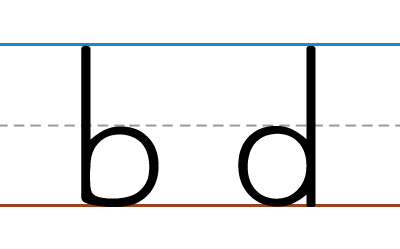
Notice how the fonts differ from one to the other more clearly?
This "tail" is what we call a learning landmark - that is a distinguishing symbol that engages the imagination to lock in and secure association.
Of course, after your child learns these fundamental differences, you can explore alternate font variations to expand their letter recognition capabilities, however, starting with a clear differentiation secures the initial concrete letter impression.
-
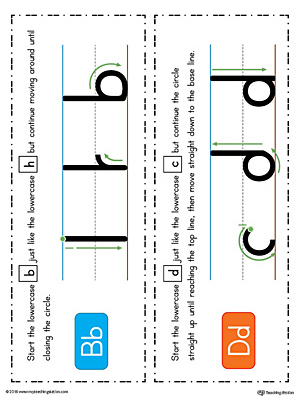
TIP #2: Use Continuous Stroke
-
A child's natural tendency for handwriting is the continuous stroke method. That is the method of handwriting that maintains pencil to paper for the complete letter formation.
Go ahead and try it - pick up a pencil and slowly write the letter b. Notice how you create it with one continuous stroke? Depending on where you started the letter will determine its ending point. Now try the same with the letter d.
By using one single continuous stroke versus creating a ball, lifting the pencil and attaching the vertical stick with a second stroke, you make a unique letter creation that helps differentiate between the b and d letters.
Also, this writing formation etches a distinct pattern into the child's mind that helps facilitate association and letter recognition.
Learn more about continuous stroke versus ball-and-stick handwriting methods.
-
TIP #3: Letter Formation
-
A common but overlooked fundamental in learning the alphabet is basic letter formation and letter starting points. Teaching your child the correct points to begin and end each letter allows for a natural formation using the continuous stroke method.
A critical mistake is to use perfect circles and lines to form letters which remove the unique and distinct shape characteristics that children recognize to help individualize and identify the letters.
Instead, treat each letter as its own character that includes starting point, ending point, shape path and formation. This method reinforces the unique markers required to differentiate and recognize each letter.
Additionally, before learning to write letters, children are already learning the traditional alphabet song and letter sequence. Using this natural advantage, the letter sequence is already imprinted in your child's mind which can be accessed to reinforce learning letter formation.
-
TIP #4: Separate Lessons
-
This teaching tip focuses on your child's spacial learning process and helps to separate letter concepts. We find it helpful to go as far as creating two separate learning booths that contain the different letters with related images that your child can enter and explore.
By separating each letter by lesson time, the learning environment and the related letter objects, you engage your child's tactile senses and provide clear guidelines for them to differentiate each letter.
You may even consider using the dining room for letter d and a bedroom for the letter b which provides another learning landmark. This practice creates an anchor in the lesson time with your child's familiar environment that triggers heightened recall.
Additionally, separating common letter reversal pairs into different letter groups is highly recommended to help divide and categorize them accordingly.
-
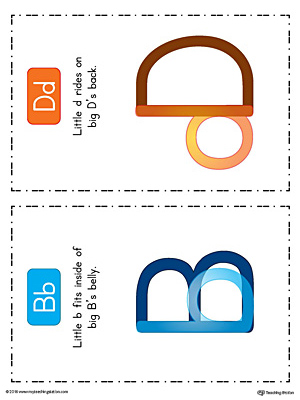
TIP #5: Related Letter Formation Associations
-
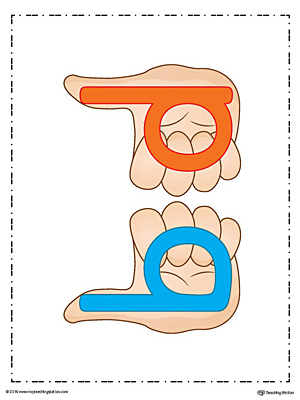
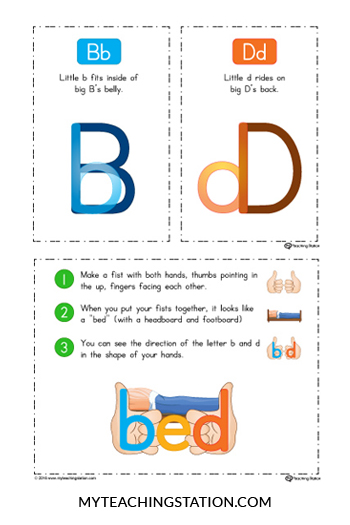
Utilizing organic teaching methods tend to produce magical results. In this case, we turn to the natural shape of the human hand to illustrate the lowercase letter b and d.
With the left hand, show your child the thumbs up sign. Then trace the letter b with your right hand over the left-hand b shape while explaining how it outlines the letter formation. Be sure to start the tracing pattern at the top of the thumb, down to the base of your hand, and then up and around in a continuous motion.
Next, draw the letter b on the whiteboard or paper and have your child compare their hand with the letter b picture. Then identify the vertical line and oval shape, or the b's bubble.
Explain that the letter b is second in the alphabet sequence which is why it uses the left hand.

Now, repeat these same steps using the right hand to form the letter d, while explaining that the letter d comes after the letter b. Of course, be sure to begin the letter d from the correct starting point at the base of the thumb instead of at the top, and continue tracing around to finish at the tail.
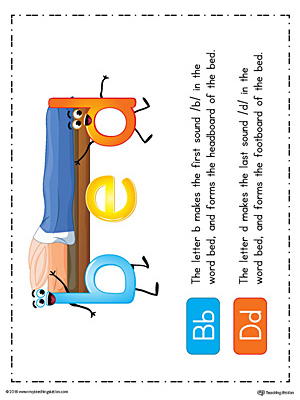
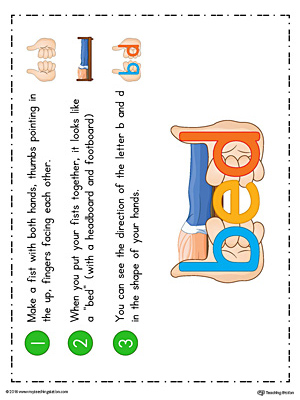
Special Note: The B-E-D activity poster uses these hand shapes to fortify the correct direction and formation, however, first, cover the basic association and verify that your child has sufficient understanding and practice before introducing it. By using the hand shapes and relationship to the drawn formation on paper, you allow your child's brain to connect and see a distinction. Once they have this base understanding, you can also implement the B-E-D activity to help fortify the lesson.
Conclusion
When the strategies revealed in these 5 teaching tips are used together, they create a synergetic learning force to eliminate confusion and anchor each fundamental letter identity.
The primary goal of this approach is to help your child build essential identifying blocks from multiple angles in the early stages of learning until they are reinforced by repetition, practice, and use.
Now that you are aware of the common mistakes, try integrating these tips and customize the approach to your own teaching style that lends to better understanding and comprehension for your students.
Happy Teaching!
Activities and Teaching Posters for B-D Letter Reversal